top of page

Experimentation and tech walkthrough

  • 3523410
  • Mar 11
  • 6 min read

Updated: Jun 6

Podcast visual experimentation (mind map):

Load video up in Clipchamp

Click on video clip- select speed icon

Adjust speed to x5.5 to make video quicker (takes it from 11:57 to 2:10)

Take volume down to 0%

Export video through Clipchamp

(Above- Mind map of my podcast visual experimentation)


I had to end up using Clip Champ as I couldn't find any way myself to transfer my screen recording for editing in Adobe Premier Pro. Even though I won't be using Premier Pro for anything else in this project, I will still be using Adobe Audition and InDesign, so this Clip Champ/different software use was only a one off.


Podcast visual experimentation (podcast logo):

For my podcast logo, I decided that I wanted to use Canva to experiment with making the logo for my podcast.


I stuck with the main block font of this logo template as I liked it, and I thought it would match my aesthetic well as I said I wanted a modern edge to my podcast visuals. This is the edit that I made to start off with to put my podcast name into the template.


As well as wanting a modern edge to my podcast, I did also want to try and use darker colours and themes within its design, so I experimented with some darker complementary colours, by changing the background to black and the words to purple.

I decided that I didn't really like this design, and that I wanted to add another visual element to it, such as a proper logo. I feel like this first experimentation would work good as an opening image slide for a podcast, but not as the actual logo.

I then went looking through Canva for a graphic that I could use, and just searched 'music' as I wasn't quite sure what I was looking for. I found this graphic that I liked which was an example of a track that could be edited with some text/images put onto it.

I transferred all of my text onto the template, and changed it to match the template colours. It is still a mostly dark logo with a little pop of colour, which matched my aim of making it still modern and appealing but with a darker edge.

The logo I have created for my podcast

I realised though that for a logo I needed to fit into a square format more instead, so went looking for a different template that was more of a rectangle so it would work better, and this what I came up with, including a few extra elements that I decided to add in.


Podcast experimentation- background music

For my podcast, behind sections and during intervals to separate between the different sections, I would need some background music that fit my project aesthetic. It needed to be something a bit more serious, but still kept elevation to the podcast and didn't make it boring. I wasn't sure at first what to use, but Kevin had sent some audio files over for us to use, so I went through them to see if there was anything that worked.

The background audios that Kevin had sent us that we could use for our podcast

I felt like none of them were right as they didn't match the vibe that I was looking for, so I just decided to go and look on YouTube instead. On YouTube I managed to find a whole playlist dedicated to podcast background music, so spent some time going through that to find what was right for me.


Tech walkthrough: Podcast editing

I dropped two of my audio files into a new Premier project ready to start editing

I dragged both of the audios onto an audio track ready for editing and taking out what wasn't needed, such as the sections in the main part of my podcast recording where I messed up

This is me editing one of my audios using the razor tool which is selected above on Premier and taking out the unnecessary sections/questions that weren't needed in the other

This is what my main podcast audio file looked like after editing. The gaps have been left purposefully so I know where to put my other audio file and music when I get further on in the editing process

This shows my second audio file which is one of my interviews, that I edited next. I managed to cut down the interview from 8mins 21secs to 3mins 34secs, as shown below


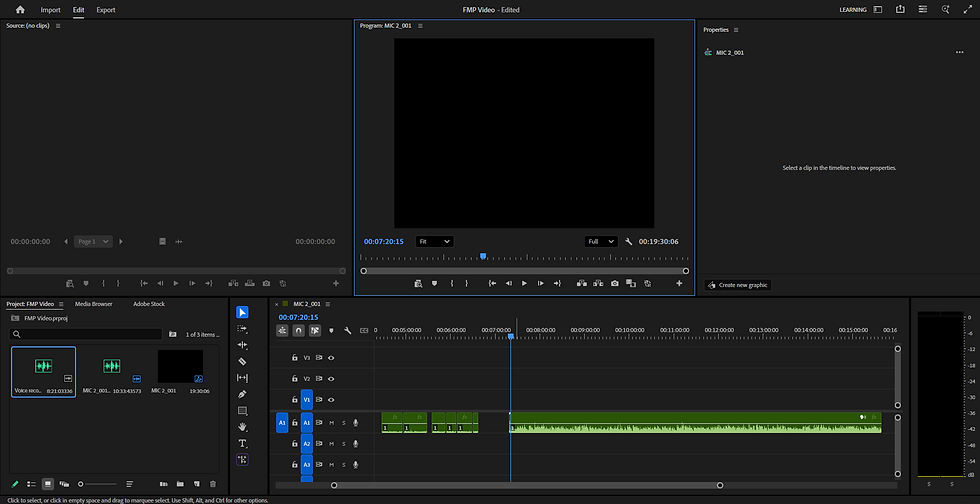
Tech walkthrough: Podcast editing (Part 2)

On Monday I began editing again, and reloaded my podcast back into Premier. Due to it all being one block now, I have to go back through listening to it and re-edit it back into the different sections

This is what it looked like after me re-editing it, again leaving the gaps for my audio files/music


Experimentation: Podcast music


Tech walkthrough: Transcripts

I just searched on Google for a transcript audio to text app

I dragged one of my files into the upload box and it turned by audio file into text

I then copied it all from the app into a Word document so it was easier for me to access

Tech walkthrough: Podcast editing (Part 3)

I put all of the audio files I was sent for my other interview in a new folder so it was easier to find and transfer into my project
I reloaded my podcast back into Premier Pro
I went back through and re-edited my podcast, leaving a gap where I was going to put my other interview
I imported all of the audio files from the interview into my project, then dragged them into the sequence so I could go through them and work out which ones I wanted to use
I then decided it would be good to have an audio bed over my interview so dragged a snippet of the audio I had picked out for my podcast and put it underneath it
I listened through all the answers and selected which ones were the most useful for my podcast based on what I had said in my introduction. I extended the audio bed to fit over all the snippets. I also left little gaps between the snippets so it flowed nicer. I decided as well to drag the music down at the end to create a fade so it blended nicely into the next section.
I went to the next section of my podcast with my other interview, and put an audio bed under that too. I also went back listening through it to check that I was confident with what I had.
After slimming down the audio from my interview, I put my podcast altogether and realised that it was over the limit. It stood at 11mins 18secs, but needed to be 10mins.
Before going back to editing, I wanted to put my chosen image (podcast logo) that I had created into the project. I screenshotted it from one of my blog pages, then formatted it as a jpeg so it was compatible with my project. I put it into my FMP Media Files folder, then dragged it onto the media sequence.
I double clicked on the image in the top box and resized it so it fit the screen as best as it could.
I went back through my podcast and made some more cuts, bringing my podcast down to 10mins 14secs. I exported the project into my FMP Media Files folder so I knew where it was, and I will upload it onto YouTube later.

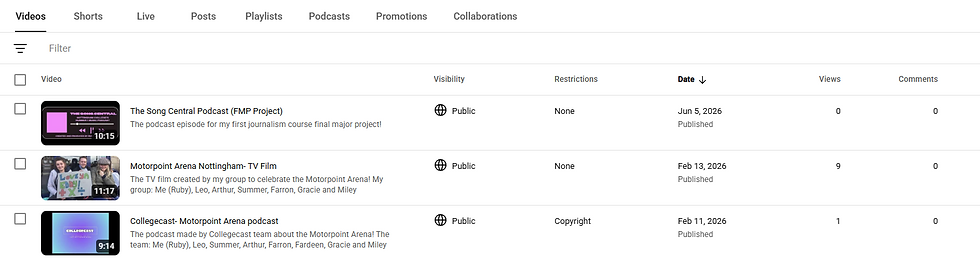
Tech walkthrough: Uploading podcast onto YouTube

I had kept my podcast in my FMP Media Files folder so I could easily upload it to YouTube when I did
I selected the file, and downloaded it to my computer
I opened up my YouTube and chose the upload video feature, where I dragged my file into the box above
This is what my video looked like on the first screen, and I altered the title and added a description
I went through all the rest of the procedures and made the video public, then uploaded it up on to my YouTube channel


Tech walkthrough: Formatting article on InDesign

So my article was easier to structure, I first downloaded the magazine template to my computer
I transferred the template into my FMP Media Files folder
I opened up Adobe InDesign and selected the template
This is what the template looked like, and I dragged two pages down the spread in the top right hand corner to make the first spread as it wasn't there beforehand

During the process of trying to copy my article, I ran into a few technical issues, including InDesign not letting me select some of the text to edit, which after some research was apparently a common issue with the app.

I also had some struggles with the fonts, which I had forgot to download and put into the template first too. I decided to open a whole new project and start from there, and thankfully it all worked that time around. To save myself any more stress, I just simply copied and pasted all my text into the template, as well as my selected images, which I found relatively easy. This is what my article looked like after all of that:

The 4 page spread for my article

To export it, I clicked file in the top left hand corner, and then export, sending it into my FMP Media Files folder.

I went back onto my Wix site and pressed add, selecting the file option shown below:

I dragged my article into the upload section, and it placed my article correctly into my post.

Recent Posts

See All
Evaluation

FMP 1 evaluation Overall evaluation: It was certainly a rollercoaster of a project to say the least, and considering it was the first time I had done anything like this, I would like to say I did pret


Final piece

Podcast: https://youtu.be/L0tndxxGcY4?si=2u_Up-_O1VWiy_rS Article:


Comments


image.png

Ruby Hemsley Journalism 2025 

bottom of page